

For some photos click for larger view

INSTRUCTIONS FOR MOM's POT HOLDERS
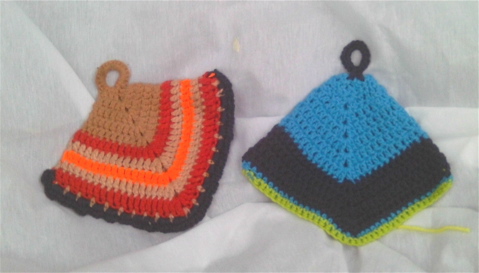 These are crocheted in one piece, double thick. Before you put the bottom row on it, combining both sides, it looks like a funny pointy eared hat.
Start with a chain of 6: first row
first 2 chains - dc
3rd chain: 2 dc, ch, 2 dc
chain 4 and 5 - dc
chain 6: 2 dc, ch, 2 dc
2nd row: dc all previous dc and in the chain spaces: 2 dc, ch, 2 dc.
3rd through 12th (or more rows if you like) row repeat 2nd row. Finish off with contrasting single crochet rows.
Make loop of 10 chains and fill the loop with single crochet. Attach to top.
INSTRUCTIONS FOR MOM's POT HOLDERS

Start with a chain of 6: first row
first 2 chains - dc
3rd chain: 2 dc, ch, 2 dc
chain 4 and 5 - dc
chain 6: 2 dc, ch, 2 dc
2nd row: dc all previous dc and in the chain spaces: 2 dc, ch, 2 dc.
3rd through 12th (or more rows if you like) row repeat 2nd row. Finish off with contrasting single crochet rows.
Make loop of 10 chains and fill the loop with single crochet. Attach to top.


THE LINK ABOVE, is the original pattern I started with. It is in stockinette. I used a Susan Bates circular needle, which was almost too long: 5.5 mm needles, 81 cm long, or size 9 US, 32 inches long. The yarn was all Big Lots $1.00 - 100% Acrylic, 50 gr. made in Turkey, purple and pink, no other lot numbers given. The multicolor ( aqua, hot pink, pale pink, tan) yarn was Gala Mixed Fiber Acrylic, Polyester, Nylon, same amount same price. For the cuddle sack all the yarn was doubled (knitted 2 strands at the same time).
I started with 84 stitches, since the original 44 seemed too small. I used mostly pink (about two and 1/2 balls, 1 ball purple for the stripes and the edge, and about half a ball multicolored. The sack is about 20 inches in circumference and 22 inches long. At the top of the sack I did Crochet 3 hdc rows in purple and then a picot stitch row all around. I have no idea what size baby this would fit. It does not matter to me, because this all goes to women's shelters. Finishing the bottom part, I knitted two stitches together until the thing got too small for my circular needles. Then I transferred the stitches to four double ended needles, as in making a sock, and when I had about 30 stitches or so left, I bound them off and sewed the hole shut.
The hat was started with a purple center, then six pink flowers, then a purple edge which had long stitches between the flowers going back to the purple center - make these tight to start the round shape see below.
It looks a bit like this, but I cannot find the original flower pattern again. This one is almost identical:

After the pink outside row in this photo, make hdc in hat shape about 7 rows, then switch to dc 5 rows then sc 3sl skip dc sc next dc, 3 slip stich, etc. one time around then do with same with the multicolored yarn. The hat is NOT done in double yarn. The hat from top to bottom is 6 inches, the bottom 3 rows are folded up. Circumference at bottom edge unfolded is 15 inches.
Hope all this is clear, don't hesitate to ask any questions.
INSTRUCTIONS FOR WOVEN SCARF

To give you the precise instructions for this particular scarf is not possible. It is firmly recorded in the "Journal of Irreproducible Results", as scientists say.
But I made a close facsimile. This one is made with an old skein of Red Heart black acrylic yarn. It is rather rigid but good for clear patterns. The finished shawl on the left is of a much softer material.
1. start with a G crochet hook and a row of 33 chain stitches.
 2. FIRST ROW: in chain stitch 29 make ** 1 dc, then 1 chain stitch while skipping chain stitch in row below ** repeat between ** and ** until dc in last stitch.
 3. SECOND ROW: Chain stitch 3, dc on top of dc below, 1 chain stitch, skip stitch, and repeat ** - ** above until enough rows for desired length. The width will be approx 8 inches.

With contrasting yarn weave through the openings lengthwise, leaving an 8 inch length on each side for fringe. Alternate weaving starting at the back or front. When this is finished cut 16 inch lengths of the same contrasting yarn - 3 for each fringe (16 on each side = 96 pieces).
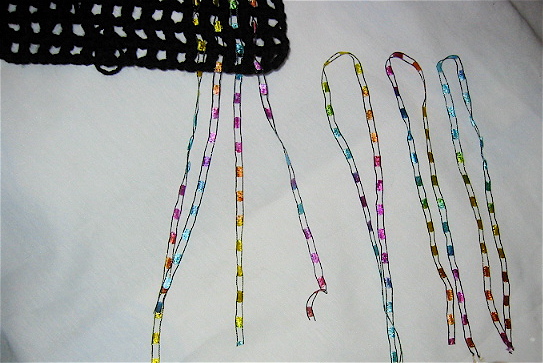

Take 3 16 inch lengths, fold in the middle, combine in a loop and with crochet hook pull the loop through the hole of the first woven yarn. When you are going to pull all the yarn through the loop you just created to make the fringe, pull along the end of the woven one - top one in photos on below.


Pull all through and tighten,

LATER:
WHAT SERENDIPIDENCE! Today, a day after I started to write up my pattern yesterday, I watched Knitting Daily on PBS, program 606, and there they used very similar techniques with weaving but with larger base pattern stitches and among other things, a shell pattern cord:
| "Knitting Daily Embellishments #606 Embellish your knitwear with custom elements! Knitting Daily looks at embellishment techniques.... in the Crochet Corner with Kristin, learn more textured crochet stitches for a variety of projects." I quickly duplicated it because I thought it was so interesting: I increased the dc to triple crochet, then two chain stitches, repeat, and six chains at the end. Then wove a rope of shell patterned cord through per the above program. |
 |
 The shell pattern is easy: make a chain stitch, double crochet 6 times in the chain, turn work around, make 6 double crochets in the middle of the shell - between 3rd and 4th dc - before, turn around, repeat. Easypeasy. The shell pattern is easy: make a chain stitch, double crochet 6 times in the chain, turn work around, make 6 double crochets in the middle of the shell - between 3rd and 4th dc - before, turn around, repeat. Easypeasy.My shell chain is a bit too big for the base, but you get the idea. PS: here it worked out better: |

INSTRUCTIONS FOR CROCHETING WITH BEADS
I used large, 1/4 inch plastic "pearlescent" or rainbow beads from my stash (I believe I got a big bucket at Big Lots once) and the opening allows a tapestry needle to go through, so that helped. I used black, Red Heart acrylic yarn and first strung all the beads on the yarn. Like I said before, I never thought that's how you do it, until I read it somewhere... I still am shaking my head about that.
Basically for the headband starts with a chain for:
FIRST row of 6 single crochet, turn

THIRD row 6 single crochet no beads turn
FOURTH row repeat SECOND row ** ** turn
Continue alternating THIRD and FOURTH row until it is long enough to cover the headband and then sew it on with the black yarn on the invisible inside, pulling it tighter at the ends where the head band is less wide.
The cuff is around a cardboard cuff from some specialty yarn I had, but you could anchor it on whatever sturdy material, is done as follows:
FIRST row 7 double crochet turn
SECOND row ** 1 dc - move a bead close to work: 1 dc with bead, 1 dc no bead, 1 dc with bead, 1 dc no bead, 1 dc with bead, 1 dc no bead **, turn
THIRD row is like FIRST row
FOURTH row is like SECOND row
I repeated the beaded rows 12 times, ending with a beaded row. Then sowed that row to the first row of 7 dc - so that all rows of beads are evenly spaced.
Finish:
On both sides of the cuff do one row of sc, then a row of picot:
***chain 4, skip 2 stitches, slip stitch in next stitch ***, repeat *** *** all around.
INSTRUCTIONS FOR CROCHETED FLOWERS
First of all, a caveat: I do not remember where I got this pattern. I am a member of a lot of forums of FREE crochet patterns and it is not my habit to take anything that is not. This particular one I printed out a long time ago. If you recognize the pattern as something protected by copy right, please notify me and I will remove it immediately.

The flowers on my straw shoulder bag were made with a G hook and Lily "The Original Sugar 'n Cream" cotton yarn and are placed on a purse that is 8x12 inches. Each flower is 3-4 inches in diameter, the leaves are about 4 inches long and at their widest, 1.75 inch, approx.
Flowers: CORRECTED PATTERN (I forgot the 1 sc between the skip and petals):
row 1: Chain 75
row 2: starting in chain 3 from end of chain, dc in each chain until end, chain one, turn
row 3: sc in 2nd dc, skip 2 dc, 8 dc in next dc, skip 2 dc, 1 sc, skip 2 dc, 8 dc in next dc, skip 2 dc, 1 sc, skip 2 dc, 8 dc in next dc, skip 2 dc, 1 sc - Then *skip 3 dc, 12 dc in next dc, skip 3 dc, 1 sc*, and repeat * *2 more times for a total of 3 times - then **skip 4 dc, 15 dc in next dc, skip 4 dc, 1 sc** , repeat ** **2 more times for a total of 3 times until the end. Slip stitch and bind off.
Then wind the flower up, until the 3 petal pattern (in 3 diff. size petals) folds nicely into a flower, and sow together at the bottom.
Leaves"
row 1: Chain 16
row 2: sc in 2nd chain from hook, hdc in next 2 ch, dc in next 3 ch, triple crochet in next 3 ch, dc in next 3 ch, hdc in next 2, sc in last three. Without turning, do the same on the other side, backwards: 3 sc, then 2 hdc, then 3 dc, then 3 triple, then 3 dc, 2 hdc, sc, slip stitch bind off. You can vary these stitches to make different shape leaves.
Leaves and flowers were attached to purse with glue gun.
NOTE: when you make the flowers you basically end up with a long row of petals
3 smaller petals (the 8 dc in 1 dc)
then 3 medium ones (12 dc in 1 dc),
and 3 largest petals (15 dc in 1 dc).
Sometimes on the last 3 largest 15 dc I put 3 chain stitches on top op 8th dc to give it extra height. You could if you wish also make the first three in half dc, the second 3 dc, and the last ones triple crochet, for another different effect. Play around, they are made very fast.
When you roll them up, start a bit at an angle so that the inner first petal peeks up and out a little, and try to place petals not exactly behind the smaller ones, pull them a bit while stitching it all together at the bottom as you go, stretching a petal to sit in the middle of the previous smaller ones, or pulling it in a little so that they are all spaced at a different angle from the previous size. That gives the illusion of a bigger bolder flower. Of course you can roll them up as tight (rosebud) or as loose as you would like, and making them with thinner or thicker yarn makes them different too.
Good luck!
No comments:
Post a Comment