Thursday, February 24, 2011

Scarf and Shawl time in SoCal?

It has been freezing here lately!  Several mornings there was ice on the car windows.  And I left my scraper in NorCal when I moved here.  I am afraid the jade tree may have bitten the dust.  When jade trees freeze they look fine for a while but slowly become mushy inside until they collapse.   Very sad...  Unfortunately, it was too large  to dig up and put inside.   In the thirteen years I have lived here, this is the first time it has been that cold that often in the winter months.  We do not even have central heating in our house because we never really needed it.  Last year we had a brief cold spell and bought a little space heater.  This year, however, we had to buy several more.  Fortunately, these cold snaps do not last very long. Still, unusual weather for SoCal and extra sweaters and long robes help, but for outside I really did not have enough "winter gear", so I have been making shawls and scarves.

Here are some of my latest efforts. Others are already gone because friends saw them and took them.  (I must teach them how to knit and crochet).  But I was flattered and anyway, one has only one neck.

OK, the one on the left is made from one $1 ball of deep purple bouclé  in a double crochet with skipping every other stitch  - 7 inches wide and as long as the ball lasted.  Then I wove a multi colored "novelty" yarn through the holes and also made tassels.  I actually made one knitted scarf of this stuff  and it is a    " b * t c h "   to work with.  It looks like a little black thread ladder inter spaced with colored silky threads which love to tangle or unravel,  and no matter how careful you are with knitting needles or crocheting (practically impossible - the loopy effect makes it hard to keep track of the stitches), it is very frustrating to process.  Not recommended, but great for tassels and weaving through. And fortunately it was cheap.  All this yarn is from Big Lots, so you know I paid very little.

The shawl on the right is of a very "hairy" multicolored yarn.  There is a slit in it, a third way in, so that one end can be pulled through the other.  But you can skip that because with all the fluff going on, you can hardly see the slit.  I added the same bothersome  yarn tassels but this time I tied opalescent beads in them.   Perhaps this is a bit clearer on the photo at the bottom, and clicking on the photos allows a larger view.


The middle one is made from a ball of dark brown bouclé yarn, thinner than the purple yarn,  and I knitted it in stockinette about 5 inches wide and about 2 yards long.  Then I crocheted from beige wool and beige speckly cotton all kinds of different motives: flowers, stars, peace symbols, etc., and sewed them on with black thread - almost invisible - and added some tassels.  For more detailed instructions click on the link.
http://fanaticalfroebeler.blogspot.com/p/how-do-i-do-that.html

They were all easy and fun to make and they keep me warm, these freezing days when I go out foraging.

For details click on HOW DO I DO THAT?

~ Tranquility and Tolerance ~

Friday, February 18, 2011

Plastic Bags: soon as extinct as the dinosaurs whence they came?

More and more stores are starting to discontinue the use of plastic shopping bags.  And that's a good thing, since they are not biodegradable and pretty toxic depending on where they are made.  .Apart from reusing them or putting them in the recycle bin, you can also repurpose them for all kinds of projects.   Fusing several layers together using an iron, can give you a basic sheet that can be painted on or sewn into other projects.  You can also cut the bags into thin strips and then knit or crochet a purse, for example. The purse on the right  was made by Cindy of "My Recycled Bags.com".    I have tried crocheting with plastic bag "yarn" as well, and it is fast and easy. 


Recently I made these envelopes from a layer of three or four plastic bags, (handles and bottoms cut off so that they can be layered flat) and topped by a colorful page from a magazine.   Any  pretty paper you may have  would work. Then I placed it all between two layers of parchment paper and with a hot iron I pressed on it for about 10-14 seconds, covering the entire area until the plastic bags fused and bonded to the decorative paper.

The parchment paper is removed and the edges trimmed to about 8 x 10 inches and folded  into envelopes, closing the sides by using my sewing machine.

I then sewed on  buttons (buttons with "stems" are pushed  through a hole and  kept in place with a safety pin inside) and added ribbons, lace, and/or elastic closure loops, and other embellishments.  You can use these envelopes for grocery coupons or whatever else you can think of.
 
The links  below have helpful tutorials and examples:

 http://blog.craftzine.com/archive/2007/08/plastic_bag_crafts.html 

http://etsylabs.blogspot.com/2007/05/long-overdue-fusing-plastic-bag.html

It is important when fusing, to work in a well ventilated area or have a fan nearby as it is probably not a good idea to inhale any possible fumes, although the actual ironing time is not very long, usually not more than 15 seconds.  But:  safety first.  Have fun!

~ Tranquility and Tolerance ~

Friday, February 11, 2011

Hearts and Letters

It is almost Valentine's day and I decided to make something for the occasion. My goal was to use only materials I had, and to buy nothing, because I already have way too much stuff.  I managed to do that.  There are always lots of branches in my yard too.  I like to use them to hang things from.  One day I will show you my snazzy branch toilet paper hanger!

 By the way, see that tree on the left?  That's our gnarly walnut.  It has a heart shape burl on it, so cool!

So I started with the roll of ribbon and divided it into 3 pieces of about 36 inches each.  It is see-through checks,  white on white with iron wire in the edges,  to keep it in shape for bows, I suppose.  Here it did not help me much and I had to run the iron over it to get the ribbon straight.   But it did bend nicely over my branches and so the 3 strips of ribbon were easy to glue on with the glue gun.

Then, a la Ruth Rae, whose book "layered, tattered & stitched", is my current craft bible  for interesting stitching projects -  If you don't have a copy yet, get one, it is well worth the small price - I stitched up the letters.


For the letters W and E I took an old pink linen napkin, folded it in half, and put some stuffing from an old bed pillow in it (pulled out to a very thin layer) to give it some body. I stitched up and down about a quarter inch or so apart in dark brown thread.   I then cut it in one inch wide strips and "built" them into letters.  Except the U, of course,  which I did freehand and which came out a bit too small I think.  But I considered it all my first Ruth Rae experiment.

From another red polka dotted napkin, I cut out a 4 hearts, sewed  two of them together  and stuffed it with the same old pillow stuffing.  Hand slip stitch the opening.

Then I glued the letters and the heart on the ribbon with the glue gun, added some little silk flowers here and there,  and glued the bottom of the three strips of white ribbon around another stick to give it some weight.

Finally, I added a bow, and a garland from the left over red dotted heart cut out pieces and a cord with which to hang it, and now it hangs on my front door, greeting visitors.


~ Tranquility and Tolerance ~

Sunday, February 6, 2011

Freestyle Heart

Remember my little free style crochet thingy from last month?  I have been working on it, and decided to shape it into a heart.  After all, it is almost Valentine's day.  No idea what to do with it next, so will let it sit a while until I get an inspiration.  It could be a pillow or a wall hanging or just simply something appliqued on the back of a jacket.  We shall see.

Before:

and after:


I basted it on a piece of muslin to hold the shape.  Want to add some embellishments too.  But for now I'll let the ideas germinate  - there's terminal germination -  in my brain.


~ Tranquility and Tolerance ~

Saturday, February 5, 2011

Chester's Shells

Remember I told you about my father-in-law,  Chester, the collector?   Perhaps dumpster diver is a more appropriate term.  Anyway,  he also collected tons of shells, very large ones, and smaller ones.  The large ones are in the yard, but I thought I should make something with the smaller ones.  The collection is quite extensive.  I have been on a lot of different beaches  but many of these shells I had never seen before.  Here's my shell wreath, and thank you Chet, for carting it all home!

The base is one of those grapevine wreaths you can get inexpensively at Michael's or Joann's.  I used the glue gun (liberally) to attach the shells.  Oh, and do this with the wreath lying flat and do not pick it up until the glue is thoroughly dried.  Shells tend to slide a bit on the glue.

After that I attached some small bunches of silk flowers for a little color, et voilà!  Bet Chet would like it.
   
~ Tranquility and Tolerance ~

Friday, February 4, 2011

Old Socks and Fingerless Gloves

Do you have old socks with holes in the soles and heels, but otherwise perfectly nice leg parts?  I cut off the feet and was saving the legs for house cleaning.  Then I developed a bit of arthritis in my left thumb.  When it gets cold I need to keep the thumb warm.   Gloves are not handy if you want to do other things too, and then I noticed people making  fingerless gloves, which basically look a lot like my cut off sock parts.  So I made some.  Eeasypeasy, and here is the "recipe" in case you have a lot of old socks that need repurposing as well.

Our socks are mostly white or grey,  So these look a bit utilitarian.  I used black yarn so that the stitches are visible.  Some socks have a nice sort of "berber" inside, which, if turned out makes a "furry" edge.    At first I just took the straight sock part, stitched the space between thumb and forefinger together  to keep it in place and wore it that way.  But it ravelled.  Then I made a seam by hand and again stitched the space between thumb and finger together. 

Eventually I wanted it to look more finished, and I made a blanket stitch along the folded over top edge, about 24 of them, each about a quarter inch apart.

Then, with a crochet hook G,  (which was a bit big but good for visibility here) I made a double crochet  in each blanket stitch, and after that a piquot edge:  **5 slip stitches, slip 5 back through slip stitch 3, two more slip stitches and slip stitch through each double crochet.  Repeat all around from ** and finish  with final slip stitch.

But it doesn't really matter what stitches you use, as long as you know basic crochet.

Stitch the space between thumb and fore finger together, and you are done.

Then,  with the gray sock, I decided to just single crochet around the whole top edge  (lightly basted hem with removable thread and no blanket stitch) making single crochets all around (about 32) and then I did the piquot stitches in each single crochet.  Works well on a heavy duty type sock.  On more delicate socks  a smaller size crochet hook is needed or better yet, use the blanket stitch first.

There was a brand thingy on the top of the sock so I hid that with a little crocheted flower. 
The white  one also has no blanket stitch, I single crocheted straight into the basted hem at the top and  added the piquot row.  Then I added a slip stitch row of the fuzzy blue yarn below it.


Hope you like this and that it inspires you to do something with your old socks other than putting them under the mattress with your savings...  If you cannot crochet you could sew a row of ruffled lace along the top.  A warning: sewing a hem on the top part on an ordinary old sewing machine will stretch the sock out to unpleasant proportions.

Also published here:  http://www.favecrafts.com/Winter/Fingerless-Gloves-Made-From-Socks

FaveCrafts.com  is a great site for all sorts of different craft projects!  Check it out, and contribute your ideas!


~ Tranquility and Tolerance ~

Mary Pipher and "Buddish"

Mary Pipher wrote a lovely book: "Seeking Peace:  Chronicles of the Worst Buddhist in the World".  I reread it ever so often and have decided, that I am, as she describes it and herself:  'BuddiSH'.  In other words:  an aspiring Buddhist. but aware of my limitations.    It is the aspiration, I believe, that counts and is most important part.

 
This  is my little meditation altar and I would like to  explain that  the Buddha is not a god.  The Buddha statue (someone's interpretation of what he may have looked like) does not represent "god". This little place in my sun room reminds me of the life, the ideals and philosophy of Gautama Buddha or Siddharta Gautama.  And it helps me focus.   I do not pray,  To the statue, or in general.  I do, however, try to meditate.

When I put a fresh flower in the vase,  light the candles and the incense, and make my singing bowl vibrate with a lovely sound, I do this with the universe in mind, and I prepare to take my place in front of this little "sanctuary for the soul" and try to enter a place  in which I can sit, and meditate and try to become peaceful in hopes of contributing to a more peaceful universe. 

Often, I am not a very successful at meditation.  I have a very busy mind which tends to wander, but that is alright.  I do try to concentrate on the flame of the candle,  and then try to clear my mind and think of nothing in particular.  That is a lot harder than it sounds.  The most I can hope for is a feeling of being at peace  and sometimes,  I sense I am in the moment, and in harmony with the universe.  I wish all sentient beings well and I resolve to do my best.   Starting and ending the day like this gives me a sense of belonging and of being part of all and everything.

That, to me, is being "Buddhish".  A daily reminder to try in my  activities and encounters to be tranquil, harmonious, caring, and tolerant.  And respectful of all sentient beings.  It is that simple.

And then again, perhaps not so much... confused Pictures, Images and Photos

~ Tranquility and Tolerance ~

Wednesday, February 2, 2011

Stones and Steampunk

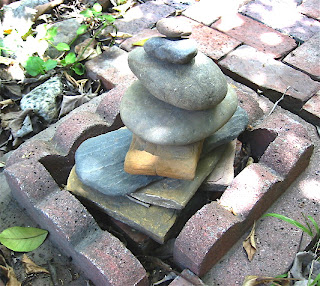
There are lots of different kinds of rocks and stones and pieces of lava in our garden.  Chester, my late father-in-law,  was a collector of obsessive compulsive proportions.  He brought  truckloads  of  them,  as well as a  lot of other things home,  from his frequent trips.  I have arranged many of these rocks around our citrus trees, and a bunch of smaller ones in  piles or "pagodas".

They are loose: no glue or cement.

These are constantly changing in configuration, because unfortunately, the cats find it a continuous source of entertainment to knock them over.  Especially when I have precariously balanced a bunch of them and they stayed in place against all expectations.  Then, in barrels Dotts the bruiser, or Inky the little lightning flash, or Smoky the deliberate doofus, and this feline wrecking crew is swift, and thorough.  I swear they then run off, chattering triumphantly.  They are all "talkers"; must be the Siamese in them.

I finally glued some of the  small ones, below,  together with some plumber's putty  - again Chester, the collector, had tubes of that in the garage, along with  all sorts of "handyman" items I haven't even really examined or figured out yet.  I understand that Chet, if not on the road, spent most of his time with his head under the hood of a car, or under the sink.

My husband, who is brilliant, is not at all interested in tinkering with tools.  So he has no clue  about all these collected old things either, or the large amount of "powerless power" tools.  By which I mean drills etc., that can be used without electricity.  One of them is  more than a yard long and is called a "yankee", which reminds me of a rather bad joke involving a Chinese Laundry.  But I have used it to build some book cases, and it is a handy tool to have, expecially during blackouts.


There are also jars and boxes with all sorts of nails, and bolts and nuts, and whatallnot other rusty iron stuff.  More than enough for a good collection of Steampunk  jewelry and embellishments.

Now there's an interesting new (for me at least)  concept: Steampunk, Google it.  I thought it was just jewelry, etc., but  there are also clothes, lingerie and accessories, for both men and women.  Sounds great.  Must try to incorporate some of that in my fabric journal and other projects in future; but no nuts in my unmentionables, thank you very much....
~ Tranquility and Tolerance ~

Tuesday, February 1, 2011

Lullaby of Birdlamp

What do you think will happen if you take an old birdbath, place a candle in it,  and cover it with an old lampshade?  Right, you get a "birdlamp".   At night, with the candle lit inside a glass holder, it looks amazingly living room-ish in our back yard.

I am still messing about with the Pearlcote.  I had an old lampshade which I was about to throw out and then my husband placed it on the birthbath, instead of, thank heavens,  his head... and said: Look a birdlamp... and then we both burst out in a rendition of  "Lullaby of Birdlamp"... we are like that: of one crazy mind.

The shade was dirty and stained, and I decided to cheer it up a bit with a bunch of leaves from the dropped off magnolias.  I glued them on with Aleene's tacky glue (is there a household left that does NOT have that handy?) and when it had dried I sprayed the whole thing with my trusty Pearlcote.  The leaves are now luminescent and seem to have held their shape as well.  (I did not glue them on totally flat but let them keep their little ruffles).

The can of Pearlcote has at least one more project in it I believe...  I'll let you know when I find something else to spray.
~ Tranquility and Tolerance ~